Battery switch on travel trailer function is crucial for managing your RV’s power. Understanding how your battery switch works—whether it’s a single, dual, or isolator type—is key to avoiding electrical problems and ensuring a smooth camping experience. This guide breaks down the different types of switches, their advantages and disadvantages, and how they control power flow between your house batteries and your vehicle’s charging system.
We’ll also cover troubleshooting, safety, maintenance, and even upgrading your system.
We’ll explore the typical wiring configurations, common issues like blown fuses or corroded connections, and provide step-by-step instructions for troubleshooting and maintenance. Learn how to prevent corrosion, perform routine checks, and even replace your battery switch if necessary. By the end, you’ll be confident in managing your travel trailer’s electrical system.
Function of the Battery Switch
The battery switch in your travel trailer is a crucial component of its electrical system, acting as a central control for your house batteries. It allows you to disconnect your house batteries completely from the rest of the trailer’s electrical system, preventing unwanted drain and protecting your batteries from damage. Think of it as a master power switch specifically for your house batteries.This switch manages the flow of power between your trailer’s house batteries and various charging sources, such as your tow vehicle’s alternator, shore power, or solar panels.
By selectively connecting or disconnecting these sources, you maintain control over your battery’s charge state and prevent accidental discharge. Proper use of the battery switch is essential for extending the lifespan of your batteries and ensuring reliable power for your appliances.
Battery Switch Wiring Configuration, Battery switch on travel trailer function
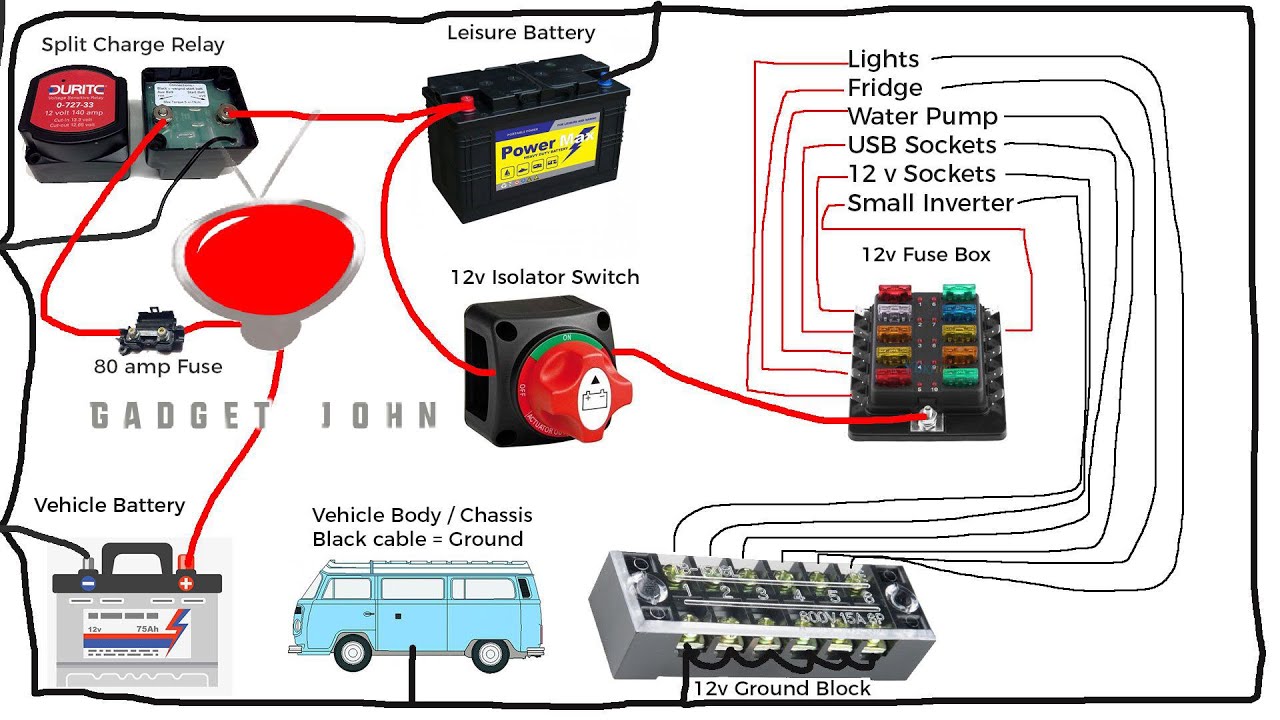
Imagine a simple diagram. At the top, we have two house batteries connected in parallel (positive terminals connected together, negative terminals connected together). From the positive terminal connection, a wire runs to the “in” terminal of the battery switch. Similarly, a wire connects the negative terminal connection to the “in” terminal of the battery switch (for the negative side).
This means both positive and negative terminals are connected to the “in” terminals of the switch. The “out” terminals of the battery switch then connect to the positive and negative bus bars of your trailer’s electrical system. These bus bars distribute power to all the 12V appliances in your RV. Another wire runs from the positive terminal of one of the house batteries (or from the positive bus bar after the switch) to your charging sources.
This could be a wire from your tow vehicle’s alternator, a wire from your shore power converter, or wires from your solar panel charge controller. These all connect to the positive side of the charging system. Finally, a ground wire connects the negative terminal of your house batteries to the trailer’s chassis. This provides a complete circuit.
When the switch is “ON,” the circuit is complete, and power flows from the batteries to the trailer’s electrical system. When “OFF,” the circuit is broken, isolating the batteries from the rest of the system. This prevents battery drain when the trailer is not in use. This setup ensures that your house batteries can be charged from multiple sources while providing a convenient way to disconnect them completely when needed.
So, you’re an audiophile who travels? Awesome! Check out this guide on building the perfect audiophile travel setup for your next adventure. It covers everything from portable DACs to noise-canceling headphones. Want something a little more luxurious? Then you might want to look into audiophile travel aetup options focusing on high-end, compact systems for the discerning listener on the go.
Seriously, getting great sound on the road isn’t impossible; just do your research!
Troubleshooting Common Battery Switch Issues
Dealing with a faulty battery switch in your travel trailer can be frustrating, but systematic troubleshooting can often pinpoint the problem quickly. Knowing where to look and what tests to perform can save you time and potential frustration on the road or at the campsite. This section Artikels common issues and provides step-by-step guidance to help you resolve them.
No Power to the Trailer
This is the most common problem. No power means your appliances aren’t working, and your lights are out. This can stem from several sources, not just the battery switch itself. It’s important to check all potential points of failure in a logical order.
- Check the Battery Switch Position: Ensure the switch is correctly set to the “on” position for either the battery or shore power. Sometimes a simple misalignment is all that’s needed to fix the problem.
- Inspect the Battery Connections: Look for corrosion, loose connections, or broken wires at both the battery terminals and the switch itself. Clean corroded terminals with a wire brush and baking soda and water, ensuring a tight connection.
- Test the Battery Voltage: Use a multimeter to check the voltage of your trailer battery. A reading significantly below 12 volts indicates a weak or dead battery requiring charging or replacement.
- Examine the Fuses: Check the fuses both in the battery switch itself (if it has inline fuses) and in the main fuse box of your travel trailer. Replace any blown fuses with fuses of the correct amperage rating.
- Verify Shore Power Connection: If you’re plugged into shore power, ensure the connection is secure at both the trailer and the power source. Check the breaker at the power source and the GFCI outlets within the trailer.
Blown Fuses
Repeatedly blowing fuses indicates a short circuit somewhere in your trailer’s electrical system. This requires careful investigation to identify the source of the short.
So, you’re an audiophile who travels? Awesome! Check out this guide for setting up your audiophile travel setup – it’s got tips on packing your gear safely and efficiently. Then, once you’ve got that sorted, consider exploring some amazing locations while enjoying your tunes; maybe even finding inspiration for your next setup from a resource like this audiophile travel aetup guide, which focuses on maximizing your listening experience on the go.
Remember, good sound doesn’t have to stay home!
- Identify the Blown Fuse: Note the amperage rating of the blown fuse to ensure replacement with the correct rating. Don’t just replace it with a higher amperage fuse; this is a fire hazard.
- Trace the Circuit: Find the circuit that the blown fuse protects. This information is often found in your trailer’s electrical diagram. Check all appliances and wiring connected to that circuit for any signs of damage or short circuits.
- Visual Inspection: Carefully examine the wiring for any exposed wires, frayed insulation, or areas where wires may be touching metal. Look for any signs of overheating, such as melting insulation or discoloration.
- Professional Help: If you cannot identify the short circuit, it is advisable to seek the help of a qualified RV electrician. Attempting repairs without the necessary knowledge could lead to further damage or safety hazards.
Corroded Connections
Corrosion can significantly impede electrical flow, leading to reduced power or complete failure. Prevention is key, but cleaning corroded connections can often restore functionality.
- Locate Corroded Connections: Carefully inspect all battery terminals, wire connections at the battery switch, and any other connections in the electrical system. Corrosion often appears as a whitish-green or bluish-green powdery substance.
- Cleaning Procedure: Use a wire brush to remove corrosion from the metal surfaces. A baking soda and water paste can help to neutralize the acid and further clean the connections. Ensure all surfaces are clean and bright before reconnecting.
- Apply Corrosion Inhibitor: After cleaning, apply a corrosion inhibitor (such as dielectric grease) to prevent future corrosion. This helps maintain a good electrical connection and extends the life of your battery and connections.
- Tighten Connections: Make sure all connections are securely tightened. Loose connections can exacerbate corrosion and lead to overheating.
Safety Precautions When Working with Battery Switches: Battery Switch On Travel Trailer Function
Working with your travel trailer’s battery system involves handling potentially dangerous electrical components. Ignoring safety precautions can lead to serious injury, including electric shock, burns, and even explosions. Understanding and following these safety measures is crucial for protecting yourself and your equipment.
Improper handling of battery switches and their connections can result in accidental short circuits, sparking, and potentially dangerous gas buildup from the batteries themselves. A short circuit can generate intense heat, potentially igniting nearby flammable materials. Battery gases, especially hydrogen, are highly flammable and can explode if ignited. Therefore, always prioritize safety when working with your travel trailer’s battery system.
Safety Guidelines for Working with Battery Switches
Before you begin any work on your travel trailer’s battery switch, it’s essential to follow these safety guidelines. These precautions will help minimize risks and ensure a safe working environment.
- Always wear safety glasses to protect your eyes from potential sparks or splashes of battery acid.
- Wear gloves made of insulating material to prevent electrical shock and protect your hands from battery acid.
- Disconnect the negative (-) battery terminal first before working on any part of the electrical system. This prevents accidental short circuits.
- Use insulated tools to prevent electrical shock. Avoid using metal tools that could conduct electricity.
- Ensure proper ventilation when working near batteries, as they release hydrogen gas, which is highly flammable and explosive.
- Never smoke or use open flames near batteries. Hydrogen gas can easily ignite.
- If working on the battery switch itself, ensure the switch is turned off before disconnecting any wires.
- If you are unsure about any aspect of working with your battery system, consult a qualified RV technician.
- Keep a fire extinguisher rated for Class B and C fires readily accessible.
- After completing your work, reconnect the battery terminals, starting with the positive (+) terminal.
Potential Hazards Associated with Incorrect Handling
Incorrect handling of battery switches and their connections can lead to several hazards. Understanding these hazards helps emphasize the importance of following the safety guidelines Artikeld above.
- Electrical Shock: Direct contact with live wires can result in a potentially fatal electrical shock.
- Burns: Short circuits can generate significant heat, causing burns to the skin and potentially igniting nearby materials.
- Battery Acid Burns: Battery acid is corrosive and can cause severe burns to skin and eyes upon contact.
- Explosions: Hydrogen gas released by batteries is highly flammable and can explode if ignited by a spark or flame.
- Damage to Electrical Components: Improper handling can damage the battery switch, wiring, and other electrical components in your travel trailer.
Upgrading or Replacing a Battery Switch
Upgrading or replacing your travel trailer’s battery switch can significantly improve its performance and longevity. This might involve switching to a higher amperage switch for larger battery banks, opting for a more robust design for increased reliability, or simply replacing a faulty switch. The choice depends on your specific needs and the current state of your system.Choosing the right replacement is key to a successful upgrade or repair.
Consider factors like the amperage rating (it must exceed your battery bank’s capacity), the number of batteries you’re managing, and the type of switch (e.g., single pole, double pole, etc.). A higher quality switch, often indicated by a higher price point and better materials, will generally offer superior durability and reliability. Always ensure the replacement switch is compatible with your existing wiring and battery setup.
Considerations When Upgrading to a Different Type of Battery Switch
Upgrading your battery switch usually involves increasing its amperage rating to accommodate a larger battery bank or more power-hungry appliances. You might also choose a switch with additional features, such as a built-in voltmeter or a more user-friendly design. Before upgrading, carefully assess your current electrical system to determine the appropriate amperage rating for the new switch. Improperly sizing the switch can lead to overheating and potential fire hazards.
For example, if you’re upgrading from a 75-amp switch to a 100-amp switch, ensure your wiring and other components can safely handle the increased current. This might involve replacing existing wiring with a thicker gauge to reduce voltage drop and heat generation.
Replacing a Faulty Battery Switch
Replacing a faulty battery switch is a straightforward process, but it’s crucial to disconnect the battery before starting any work to prevent electrical shocks. This ensures your safety and prevents damage to your electrical system. Always use appropriate safety gear, including insulated gloves and eye protection. The specific steps will vary slightly depending on the switch’s make and model, but the general procedure remains consistent.
Step-by-Step Guide for Replacing a Battery Switch
Before beginning, remember to disconnect the negative battery cable first. This is a critical safety precaution to prevent accidental shorts and shocks.
- Disconnect the Battery: Disconnect the negative (-) battery cable from the battery terminal. Then, disconnect the positive (+) cable.
- Remove the Old Switch: Carefully remove the old battery switch from its mounting location. This might involve unscrewing mounting bolts or releasing clips. Take note of the wiring configuration before disconnecting any wires.
- Prepare the New Switch: Inspect the new battery switch to ensure it’s compatible with your system’s amperage rating and wiring configuration. Note the terminal markings (positive and negative).
- Connect the Wiring: Connect the wires to the new battery switch according to the wiring diagram and the markings on the switch. Double-check all connections to ensure they are secure and correctly matched to avoid shorts or incorrect functionality.
- Mount the New Switch: Securely mount the new battery switch in its designated location using the appropriate mounting hardware.
- Reconnect the Battery: Reconnect the positive (+) battery cable first, followed by the negative (-) cable.
- Test the Switch: Test the new battery switch to ensure it functions correctly. Check all positions of the switch to verify that power is properly routed and that the system is operating as expected.
Mastering your travel trailer’s battery switch is about more than just turning power on and off; it’s about understanding your RV’s electrical system and ensuring reliable power for your adventures. By following the safety precautions, performing regular maintenance, and knowing how to troubleshoot common problems, you’ll keep your batteries healthy and your camping trips powered up. Remember, a little preventative care goes a long way in avoiding costly repairs and ensuring many happy camping memories!
Key Questions Answered
What happens if my battery switch is left in the “off” position?
Leaving the switch off completely disconnects your house batteries from all power sources, preventing discharge and protecting your batteries from damage. However, you’ll have no power to your appliances.
How often should I clean my battery switch terminals?
At least once a year, or more frequently if you notice corrosion or white residue. Clean terminals prevent poor connections and potential electrical problems.
Can I use a different type of battery switch than what came with my trailer?
Yes, but ensure the new switch is compatible with your trailer’s wiring and amperage requirements. Consult a qualified RV technician if you’re unsure.
Why is my battery switch getting hot?
A hot battery switch could indicate a loose connection, high current draw, or a faulty switch itself. Inspect for loose wires and address any high-current draw issues before replacing the switch.
